Tag: linux

  • Persist Asus battery charge limit after reboot on Fedora

    Despite many issues reported over the last years about this problem, as of Fedora Kinoite 44 on kernel 7.1.3 with KDE Plasma 6.7.2 it is still not possible to persist the battery’s maximum charge limit upon a reboot. To be fair it is mainly due to the laptop manufacturers’ way of resetting the value to 100% charge level upon each boot.

    Having to remember and set this value upon each boot may seem like no task but it becomes a real nuisance after each update. Running Fedore Kinoite means that a reboot is needed after each system upgrade so it happens more often than perhaps in the past when only a kernel upgrade needed a reboot.

    In this scenario the 2024 Asus TUF laptop does accept custom set charge limits providing plenty of flexibility for multiple use cases. I would usually set it at 50% level unless the laptop is needed on batteries later where it can then be raised to 80% prior to leaving AC power. This should ensure future battery health for many years.

    The “Charge Limit” value is set inside the “Power Management” settings under “Configure Advanced Settings” in the top right corner. I would guess each laptop would have different options depending on what the hardware exposes to the system. By default the value is 100% after boot so simply change it to the value you desire. You will be asked to authenticate as it is a system wide setting.

    Avoiding this cumbersome task is rather simple though. Until it gets fixed we can just set the charge limit programmatically upon each boot. There are several ways to skin the cat so the following is in my opinion the simplest and cleanest one. Using the tmpfiles.d service we can do this pretty fast (if curious there are many systemd-tmpfiles uses).

    First we can actually check the current battery charge limit value (please note BAT0 may instead be BATn on your device, usually 0-4):

    $ cat /sys/class/power_supply/BAT0/charge_control_end_threshold
    100

    Then let us set and get the new value through here instead of using the GUI:

    $ echo 50 > /sys/class/power_supply/BAT0/charge_control_end_threshold
    $ cat /sys/class/power_supply/BAT0/charge_control_end_threshold
    50

    This would work fine for a quick change but now we will create the instructions to tmpfiles to do it at boot instead:

    $ sudo vim /etc/tmpfiles.d/asus-battery.conf
    $ cat /etc/tmpfiles.d/asus-battery.conf
    # Type  Path                                                 Mode UID  GID  Age Argument
    w-      /sys/class/power_supply/BAT0/charge_control_end_threshold -    -    -    -   50
    

    The formatting needs to be as is, so please bear in mind that depending on the width of your screen it may not be displayed properly right here, so if you copy and paste the content into a text editor it would be easier to see. The first line is just a comment for reference so you get the idea of each column, the real action happens in the second line. Here the value of 50 is written into “/sys/class/power_supply/BAT0/charge_control_end_threshold” just as we did manually before.

    After next reboot the system will automatically change the charge limit, to 50% in this case. Obviously just change this value to the desired default. Please note that you can always later modify temporarily the limit in the GUI settings as shown earlier. This last change would apply until next reboot only.
  • AppImages require FUSE to run in Fedora Kinoite 44

    When running the latest VictronConnect Linux AppImage (v6.34) on Fedora Kinoite 44 an error is reported and it fails to launch:

    dlopen(): error loading libfuse.so.2

    AppImages require FUSE to run.  
    You might still be able to extract the contents of this AppImage if you run it with the --appimage-extract option.  
    See https://github.com/AppImage/AppImageKit/wiki/FUSE for more information

    Fedora actually came by default with both FUSE 2 and 3 but since version 44 FUSE 2 is no longer included due to security concerns.

    The option to run this AppImage and any other for that matter is to run it with the “–appimage-extract-and-run” parameter. This would simply extract its content directly on disk and delete it afterwards. Usually it would have run inside the FUSE virtual file system:

    $ Downloads/VictronConnect-x86_64_v6.34.appimage --appimage-extract-and-run

    The real solution would be for the Victron developers to use the latest AppImage which has FUSE 3 built-in.

  • Google Earth – Another instance of this application is already running

    Being unable to launch Google Earth Pro because it thinks it is already running seems to be happening frequently for me. I am using the Flatpak version if it matters.

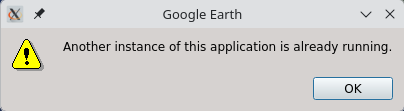
    Despite killing the application there is still a lock file lingering preventing Google Earth Pro to launch. The error message is specifically:

    Google Earth
    Another instance of this application is already running.

    To launch Google Earth again you need to delete this stale lock file which is inside your user directory:

    rm -v $HOME/.var/app/com.google.EarthPro/.googleearth/instance-running-lock

    Once gone Google Earth Pro will run again without complaining.

  • Rapidly reduce the size of a PDF

    I am sure you have been there before, trying to submit an important form and your PDF with high resolution scans is too big to be accepted.

    As you probably entered a lot of other data, you do not want to repeat the entire form if the page times out (which they seem to always do!).

    This is an instant one-liner that substantially reduces the PDF size without much quality degradation (my PDF went from 8.9 MiB to 1.1 Mib):

    gs -sDEVICE=pdfwrite -dCompatibilityLevel=1.4 \
    -dPDFSETTINGS=/ebook \
    -dNOPAUSE -dQUIET -dBATCH \
    -sOutputFile=output.pdf input.pdf

    There are tons of options and parameters in Ghostscript to play with if you are interested, but the above will work for a start. Simply edit the input.pdf and output.pdf paths/files.

  • Toolbx mount access from host on Fedora Kinoite

    Since Toolbx mounts are running in different namespaces than the host, the mounts cannot be accessed from the latter. I tried many workarounds to see if it really was possible to get around this limit. After some time I decided that using the network stack was probably a better solution to communicate between Toolbx and host.

    In my particular case I never do any layering but instead try to use Flatpak, Toolbx, or even a Boxes virtual machine for any specific software not included in the base layering.

    I needed to run restic to access some documents on a remote restic repo backup. Since restic is not included I had to use Toolbx for this task. Restic uses FUSE to mount the remote end on the local system. In an ideal world I could just have opened this mount in Dolphin to search and open the needed documents. However due to the namespaces difference this mount just shows empty on the host.

    A really quick and dirty solution is to simply use rclone and its webdav option, then Dolphin just opens the webdav address with no issues. Yes, there is a tiny performance hit, but the speed and easy execution greatly makes up for this:

    restic mount ~/remote-restic

    Now that the mount is working from Toolbx itself run rclone to serve it over the network:

    rclone serve webdav ~/remote-restic --addr :8080 -L

    That is all! Now simply open Dolphin and paste the webdav address and there you have your Toolbx mount visible from the host:

    dav://127.0.0.1:8080

    Please note that this is not only for restic but can be used with any mount type like sshfs or even another rclone mount like S3.

    Is it not ironic… using a 1990s protocol (WebDAV) to solve a 2026 container problem!